Go to Blogger edit html and find these sentences.Now replace these sentences with your own descriptions.This theme is Bloggerized by Lasantha Bandara - Premiumbloggertemplates.com.
Go to Blogger edit html and find these sentences.Now replace these sentences with your own descriptions.This theme is Bloggerized by Lasantha Bandara - Premiumbloggertemplates.com.
Go to Blogger edit html and find these sentences.Now replace these sentences with your own descriptions.This theme is Bloggerized by Lasantha Bandara - Premiumbloggertemplates.com.
Go to Blogger edit html and find these sentences.Now replace these sentences with your own descriptions.This theme is Bloggerized by Lasantha Bandara - Premiumbloggertemplates.com.
Go to Blogger edit html and find these sentences.Now replace these sentences with your own descriptions.This theme is Bloggerized by Lasantha Bandara - Premiumbloggertemplates.com.
<div id="slider">
<a href="http://www.spiceupyourblog.com"><img src="https://blogger.googleusercontent.com/img/b/R29vZ2xl/AVvXsEisdP7VBy7OkYcmJ0YM0PDhTk-GhgSDXXs8rVPdMdp8HG2difgXNB4_1sUZzDUz9rpB78zMvu_snGiHgdKUELENNuQjml8c_iTXdge5BrfPHptLPEsXvc0ANYz_W3fkuedCcMpfDgmuwDE/s1600/toystory.jpg" title="This Is A Caption" /></a>
<a href="http://www.spiceupyourblog.com"><img src="https://blogger.googleusercontent.com/img/b/R29vZ2xl/AVvXsEiZb9A64F_M4G0CiFWohJk8DGpkFOTEVNH6rdUPULcMX6lZ7OZiUwx0J34vOLfjE7jjEPfTcX8HZ3d2D6Eqp7pdixXYsppzawCFt-nXyeH_Wk3u5RQyuHVYnzYOdudLU6kbnhsvhrC6nUo/s1600/up.jpg" title="This Is Another Caption" /></a>
<a href="http://www.spiceupyourblog.com"><img src="https://blogger.googleusercontent.com/img/b/R29vZ2xl/AVvXsEhDiQK9ZDERVD5EuDOJ1oxTKkKVRamZVsx8clW3oqECuwkVn62-8ggeXZShnBeo4iOvWTzOPB1zYRmq69S_q2G99esr94u10FMWQ8DZmzzFmbY7nx8W_ecsiC_iKXRBmK0a_hpKTWX1IZ8/s1600/walle.jpg" title="This is an example of a caption" /></a>
<a href="http://www.spiceupyourblog.com"><img src="https://blogger.googleusercontent.com/img/b/R29vZ2xl/AVvXsEifUzlio7FH9-Gu3EqOOi8NfPIBS7NOFxsBhn9USQURiccHz6j6eKk78_l3sYpcTKk7OJ0ry58RzZQOqPmyDjHJM_Ebf8iAvSPuCEZ9nsZNQULzuF0UHMs3lqaZzv6-aygfP7J6NflQ3lc/s1600/nemo.jpg" title="This is another Caption" /></a>
</div>
Advanced Token Managerallows you to back up all the information that Windows uses to check the validity of your copy of Windows. Called a Token, this information can be backed up to an external storage medium. Once you have formatted you can import the Token and your Windows will begenuineagain.
Here’s how to backup and then restore the activation status of Windows 7.
1. Download Advanced Token Manager from here, you can extract the zip file and then run the executable file.
2. Run advanced token manager, to begin backing up your token click on the Backup Activation button.
3. ** “If you get the Hidden Product Key Detected Pop Up” ** Just click yes to continue.
4. When the Back up finishes. You will see a folder called “Windows Activation Backup” in the same Location that you launched the token manager from, That contains the backup
5. Once you Re-install windows, run the advanced token manager, this time it will say Restore instead of Backup.
7. Once you click Restore you will be prompted to make sure you want to do this, click the next button to start the restoration
8. Once completed a success message will appear.
9. Check your validity in the System Settings, you should have the genuine badge back.
The Backup Compatibility is:
Office 2010 Windows 7 Windows Vista Windows Server 2011
Windows Server 2008 R2
For any query use the comment form below. Subscribe and like :D PEACE.
Hey guyz, have a crashed computer with personal or maybe important data in it. Forgot to backup and now want to recover it? This is a great way to recover files from a crashed computer I don’t like to use the dead word because a dead computer is a computer that does’t turn on. To recover the files you would need Hiren’s BootDisk this disk has tremendous amount of tools that we can use all in one disk.
4. When you finally boot from the Hiren’s Disk, select Windows Mini XP. Is not going to install it just going to run a mini version of Windows XP.
5. When you get to the Desktop you can browse just like you would in any version of Windows. Go to My Computer.
6. Because we booted from the Disk the letters belonging to the Drives have changed. Try to Identify your drive by the name or size.
7. You can plug in an additional drive and it will be detected just like any Windows would and now you can copy and paste any files you need.
8. Or you can run a backup tool, one of the many tools that Hiren’s brings.
9. From the Desktop Click on HBCD Icon then click on programs then Backup from the drop down menu then FastCopy.
10. From the FastCopy options you can select a folder or a Hard Drive to be the source location.
11.As a Destination Dirctory you can select a Pen Drive or external Hard Drive.
Note: If you are Backing up the entire Hard Drive make sure that the Destination Directory drive is Bigger than the amount of spaced used on you source drive.
If you have problems ask me through the comment box below. Subscribe and like :D PEACE.
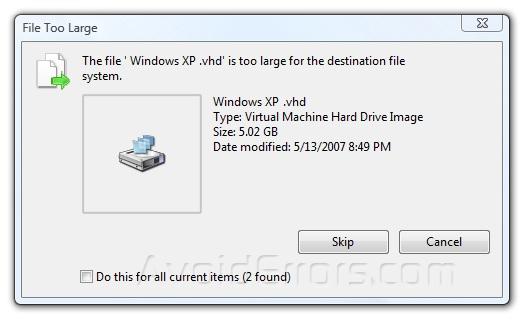
The capacity of your external flash drive is large: 8GB, 16GB, or more. There is enough free space on the drive. You can copy the smaller files to the external drive just fine. Yet, when you attempt to copy a large file (4GB or larger) to the external drive, Windows gives you an error (such as: There is not enough free space on the drive, or similar.) Does this sound familiar?
If you experience such a problem, most probably it’s caused by the fact that your flash drive is formatted with the FAT32 file system. This type of a file system has a built-in limitation on the size of the files that it may contain. Although the total size of the files that you can copy to a FAT32 drive could be as large as 2TB (or the physical capacity of the drive, whichever is smaller), the size of each individual file may not exceed 4GB.
This limitation may sound silly: why would anyone design a system that would not allow for the larger files? The problem is, when the FAT32 file system was designed (that was back in the days of Windows 95), no one anticipated that we would have such large files in use today. Or, maybe the designers hoped that by the time such large files become common, the use of the FAT32 system would be replaced by the more modern systems.
In any case, how to solve the problem of copying the 4GB files? Easy: you need to replace the FAT32 file system on the drive with the NTFS file system. The latter does not have the 4GB file size limitation, and it also allows for many other functions not supported by FAT32: file security, encryption, compression, etc.
One caveat, however: the older versions of Windows (such as Windows 95, 98, or Windows Millennium, remember those?) do not support the NTFS file system. If you plan on using the drive with such old computers, then DO NOT format the drive with NTFS, because you won’t be able to get the old Windows to recognize it anyway. If, however, you only plan on using the drive with the more recent versions of Windows, such as Windows 2000, Windows XP, Windows Vista, and of course Windows 7, such computers should work with the NTFS drives just fine.
How to change the drive from FAT32 to NTFS format?
There are several ways to go. If the drive is empty or contains no important files of yours, the easiest way is to use the Windows Format command to format the drive with the NTFS file system. Specifically:
1. Attach the external flash drive to the computer, wait for Windows to recognize it and assign a new drive letter to it.
2. Open the Computer folder and locate the drive letter assigned to the flash drive you want to format with NTFS (in the example below, it’s drive F:)
3. Before continuing, open the drive in a window and make sure it’s empty or does not contain any important files, because after you format a drive, all information that was on it will be erased! If there are files on the drive that you want to keep, take this opportunity to copy them over to the hard drive or some other drive.
4. If you are sure that the external drive contains no important files of yours, go back to the Computer folder, and right click on the icon of the external drive:
(Click to enlarge)
5. Select Format from the menu, and then choose the formatting options:
6. Make sure to select NTFS in the File System drop-down list. That’s what determines the kind of a file system that the drive should have. Also, you may want to select the Quick Format option, which should speed up the formatting process quite considerably.
7. Press Start, and Windows should warn you once again about erasing any existing information on the drive (see step 3 above). Again, if you are sure the drive does not contain any irreplaceable documents, confirm that you want to proceed with the formatting:
8. If you’ve selected the Quick format option, the formatting should take no longer than a minute or two.
As a result, you should have the same drive, but now it should have the NTFS files system on it. Now you should be able to copy the files larger than 4GB to the drive just fine.
You can use a Windows Command Prompt command to convert a FAT volume to NTFS. Open a Command Prompt window (Start | type CMD and Enter into the search dialog to open a window). To see the full syntax of the command and to verify that the command is present in your version of Windows type (no quotes) "CONVERT /?" at the command prompt and hit Enter. This should give you the help and if it comes up you have the command available to use. The command to convert any drive from FAT to NTFS would then be: CONVERT d: /FS:NTFS where d: is the drive letter of the disk/volume you wish to convert. If you want to watch the details add a /V (for verbose) to the command. Also, to enable all users to access the drive, just in case you might want to also add /NoSecurity to the command line. These latter two are optional and usually not needed. Also, this procedure does not erase the disk so files should be safe. As in all things computer, having a backup of important files is critical no matter what and I'd be careful if the disk is almost full as FAT and NTFS disks likely have different sector sizes and therefore hold different amounts of information.
For queries and views use the comment form below. Subscribe and Like:D PEACE.
Hey guys, want to install window in your pc through usb drive but don't know how to do that. Don't worry, by the end of this post you'll be able to make your very own Bootable pen drive.The easiest and fastest way is to use the utilities already available on the internet.
Method 1: Using UnetBootin UnetBootin lets you create Bootable pen drive without any hassle. Just follow these three simple steps. CHOOSE.BROWSE.OK.
1.CHOOSE: If using Windows, run the UNETBOOTIN, select an ISO file or a distribution to download.
2.BROWSE: Browse the .iso file and select a target drive (USB Drive,say D), from the type(Refer the below picture). If your USB drive doesn't show up, reformat it as FAT32.
3.OK: Hit OK and wait for the process to end and your Bootable pen drive is ready.
==>If using Linux, make the file executable (using either the command chmod +x ./unetbootin-linux, or going to Properties->Permissions and checking "Execute"), then start the application, you will be prompted for your password to grant the application administrative rights, then the main dialog will appear, where you select a distribution and install target (USB Drive or Hard Disk), then reboot when prompted.
==>After rebooting, if you created a Live USB drive by selecting "USB Drive" as your install target, press the appropriate button (usually F1, F2, F12, ESC, or backspace) while your computer is starting up to get to your BIOS boot menu and select USB drive as the startup target; otherwise if there's no boot selection option, go to the BIOS setup menu and change the startup order to boot USB by default. Note that Live USB drives are bootable only on PCs (not on Macs). Otherwise, if you did a "frugal install" by selecting "Hard Disk" as your install target, select the UNetbootin entry from the Windows Boot Menu as the system boots up.
It is yet another utility that lets you create bootable pendrive without breaking a sweat. Just follow the instructions in the following video(Video compiled by mullinsJ08) and you'll be able to do it yourself.
In the above video you can also use Deamon Tools to mount the .iso file and then use it as a CD Drive instead of extracting the .iso file.
Though the above two utilities are better than this one, but just for knowledge purpose that another tool exists, I am mentioning it. Nothing much to tell here, just choose the .iso file and hit ok and you are good to go.
Method 4: Using Hp utilities
Try these 2 USB Flash Drive Utilities by HP/Compaq. They work with Most other brands of flash drives as well.
hpflash2.zip HP USB Disk Storage Format Tool. Formerly called hpflash1.zip
1. Install the HP USB Disk Storage Format Tool and run the program. 2. Select the Device and the File system from the drop down menus and click start. 3. Close the above program and install and run the HP Drive Key Boot Utility. Selecting the appropriate drive letter. Click Next. 4.Select the circle on the top that says create New or Replace Existing Configuration. Click Next. 5. Select the circle labeled Hard Drive. Click Next. 6. Select Create New Filesystem. Click Next. 7. Select the circle labeled HP Firmware Flash Package. Click Next. Click Finish
Method 5: Using the inbuilt utility in Windows vista/7:
Just follow these simple steps:
1. Plug in your USB Flash Drive
2. Open a command prompt as administrator (Right click on Start > All Programs > Accessories > Command Prompt and select “Run as administrator”
3. Find the drive number of your USB Drive by typing the following into the Command Prompt window:
diskpart
list disk
The number of your USB drive will listed. You’ll need this for the next step. I’ll assume that the USB flash drive is disk 1.
4. Format the drive by typing the next instructions into the same window. Replace the number “1” with the number of your disk below.
select disk 1
clean
create partition primary
select partition 1
active
format fs=NTFS
assign
exit
When that is done you’ll have a formatted USB flash drive ready to be made Bootable. And yes, you can just format it by right clicking and choosing the format option :D
Step 2: Make the Drive Bootable
Next we’ll use the bootsect utility that comes on the Vista or Windows 7 disk to make the flash drive bootable. In the same command window that you were using in Step 1:
1. Insert your Windows Vista / 7 DVD into your drive.
2. Change directory to the DVD’s boot directory where bootsect lives:
d:
cd d:\boot
3. Use bootsect to set the USB as a bootable NTFS drive prepared for a Vista/7 image. I’m assuming that your USB flash drive has been labeled disk G:\ by the computer:
bootsect /nt60 g:
4. You can now close the command prompt window, we’re done here.
Step 3: Copy the installation DVD to the USB drive
The easiest way is to use Windows explorer to copy all of the files on your DVD on to the formatted flash drive. After you’ve copied all of the files the disk you are ready to go.
Step 4: Set your BIOS to boot from USB
This is where you’re on your own since every computer is different. Most BIOS’s allow you to hit a key at boot and select a boot option.
That was all on HOW TO CREATE YOUR VERY OWN BOOTABLE PENDRIVE. For queries, your views, use the comment form below and don't forget to subscribe and like :D PEACE.
If you are using windows and you constantly try to experiment with it, then this thought must have came into mind that HOW TO CUSTOMIZE THE LOGON SCREEN. In XP you had to go through various registry edits which were difficult and often very confusing. But in Windows 7, this is not the case. Microsoft people have taken care of this thing in Windows 7, so that you don't have to go through various regedits to customize the logon screen. Just one registry edit and you are good to go. Just follow the steps below and you'll be able to customize it in no time.
Manually: STEPS : 1. Press Win key+R and type regedit and hit enter.
2. Go to HKEY_Local_Machine ->Software->Microsoft->Windows->CurrentVersion->Authentication->LogonUI->Background
3. Double click on key named OEMBackground and change its value to 1.
There you go, you have done the registry part now some simple edits and the task is done.
4.Go to C:\Windows\System32\oobe\info\backgrounds.(If info or backgrounds folder is not present then create one).
5. Now put in any JPG file with size less than 256 kb in this folder and rename it to backgroundDefault.jpg. This file will be stretched to fit the screen, so you would want it to match the resolution of your screen so that image doesn’t look bad. You can use something like smush.it or Photoshop’s Save as/Save for Web feature to reduce image size.
With the help of tools: Steps:
1. Download the Logon Changer from Tweaks.com, that lets you choose a image file to use as your logon background. That all what you do, just choose an image and Logon Changer will take care of everything else including the file size limit. It also makes it super easy to revert back to the default Logon Screen.
OR
2. Download the Windows 7 Logon Screen Rotator– takes the logon screen customization one step further by allowing you to select a set of images. It will then randomly use one of these images as the logon screen.
There you have it. Using any of the above method you can easily change Windows 7 logon screen to any wallpaper of your choice or that witty one liner graphic you created yourself or perhaps even one of your photos as long as they meet the requirements. Let me know your experience of using these methods and I would love to see what you have as your logon screen. Mention them in comments!
One topic you might hear people discussing when they're talking shop about computers is how much random access memory (RAM) they need to add to their computer. Up to a point, adding RAM will normally cause your computer to seem faster on certain types of operations. RAM is important because it eliminates the need to "swap" programs in and out.
When you run a program such as a word processor or an Internet browser, the microprocessor in your computer pulls the executable file (.exe) off the hard disk and loads it into RAM. Large programs like Microsoft Word or Excel use large amounts ofmemory. The microprocessor also pulls in a number of shared dynamic link libraries (DLLs) -- shared pieces of code used by multiple applications. The DLLs take many more megabytes.
Then the microprocessor loads in the data files at which you want to look, which might total several megabytes if you are looking at more than one document or browsing a page with a lot of graphics. So a big application can easily take 100 megabytes of RAM or more, which can slow your system down significantly if there isn't enough memory. On your machine, at any given time you might have the following applications running:
A word processor
A spreadsheet
An e-mail program
A drawing program
Three or four browser windows
A fax program
A Telnet session
Besides all of those applications, the operating system itself is taking up a good bit of space. Everything together may need more RAM than your machine has. Where does all the extra RAM space come from?
The extra space in your computer's RAM is created by an important operating system component called the virtual memorymanager (VMM). The VMM looks at RAM and finds sections that aren't currently needed. It puts these sections of RAM in a place called the swap file on the hard disk. For example, let's say you have your e-mail program open, even though you haven't looked at e-mail in the last 45 minutes. The VMM moves all of the bytes making up the e-mail program's .exe, DLLs and data out to the hard disk. That's called swapping out the program. The next time you click on the e-mail program, the VMM will swap in all of its bytes from the hard disk, and probably swap something else out in the process. Because the hard disk is relatively slow compared to RAM, the act of swapping things in and out causes a noticeable delay.
So should you just keep adding more RAM until your pockets are empty or your computer can't hold any more? If you have a very small amount of RAM (say, 256 megabytes), then the VMM is always swapping things in and out to get anything done. In that case, your computer feels like it is crawling. As you add more RAM, you get to a point where you only notice the swapping when you load a new program or change windows. Once your computer has more RAM than the software running on the machine uses, the VMM has plenty of room and you should never see it swapping anything. After that, adding more memory would have no effect.
Some applications -- like Photoshop, many compilers, most film editing and animation packages -- need large amounts of RAM to do their job. If you run them on a machine with too little RAM, they swap constantly and run very slowly. You can get a huge speed boost by adding enough RAM to eliminate the swapping. Programs like these may run 10 to 50 times faster once they have enough RAM. Leave comments below if you have any doubt and queries or simply want to comment on the post.